2.4. Definition of domains
PAGO allows to define closed domains, in which budgets calculations can be performed.
This is down by using the pypago.areas.Area class.
2.4.1. Defining a domain using polygons
The user can define a closed polygon by using a longitude/latitude polygon
by using the pypago.areas.extract_dom_from_pol() function.
This function takes as argument the pypago.grid.Grid class associated with
the model, the longitude and the latitude of the polygon.
import pypago.areas
import pypago.pyio
import pylab as plt
import numpy as np

# load the grid and grid sections
grid = pypago.pyio.load('data/natl_grid.pygo')

# define a polygone and extract the i,j indexes of the points within the domain
lonpol = [-60, -41, -28, -44]
latpol = [62, 48, 65, 60]
i, j = pypago.areas.extract_dom_from_pol(grid, lonpol, latpol)

# create the area object
areaname = 'areatest'
areas = pypago.areas.Areas(grid, areaname, i, j)

# Plot the domain area

plt.figure()
plt.subplot(2, 1, 1)
plt.title('Bathymetry (geographical coordinates)')
grid.bathy = np.ma.masked_where(grid.mask==0, grid.bathy)
plt.pcolormesh(grid.lont, grid.latt, grid.bathy[1:, 1:])
plt.plot(lonpol, latpol)

plt.subplot(2, 1, 2)
plt.title('Area mask (index coordinate)')
grid.plot_mask()
plt.imshow(areas.mask, origin='lower', interpolation='none')
plt.savefig('figs/domdef_pol.png', bbox_inches='tight')
In [1]: import os

In [2]: cwd = os.getcwd()

In [3]: print(cwd)
/home/barrier/Codes/pago/pypago/doc_pypago

In [4]: fpath = "examples/define_areas.py"

In [5]: with open(fpath) as f:
   ...:     code = compile(f.read(), fpath, 'exec')
   ...:     exec(code)
   ...:
In [6]: print(areas)
Domain area, NEMO model:
  -i: (77,)
  -imax: 160
  -imin: 90
  -j: (77,)
  -jmax: 147
  -jmin: 80
  -mask: (68, 71)
  -modelname: NEMO
  -name: areatest
  -nlon: 182
  -secnames: None
  -signs: None
  -surface: (77,)
  -volume: (31, 77)
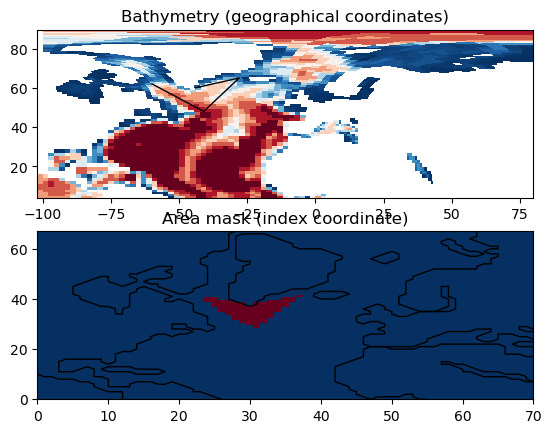
Fig. 2.15 Definition of a triangular domain from a polygon
Note
If the polygon is not closed, it is closed automatically by the program
Todo
Extend to circular domains?
2.4.2. Defining a domain using gridded sections
Another possibility for defining closed domains is to use gridded sections as boundaries. This is especially usefull when computing heat budgets and assessing the relative contributions of surface heat fluxes and ocean heat advection ([BDTC15]).
This is achieved by using the interactive script pypago.bin.make_areas as follows:
make_areas.py data/natl_grid.pygo data/natl_gridsec.pygo data/natl_domain.pygo
The arguments are the grid file, the gridded section file and the output file.
As a first step, the program displays Fig. 2.16. And in the terminal, the program asks the names of the sections that close the domain and their orientations (“in” if the transport is oriented toward the domain, “out” if the transport is oriented out of the domain). In the terminal, this gives:
name of the area? natldom
give names of the sections (separate the names by a space) section1 section2 section3 section4
give orientation of the sections (in: directed toward the basin/out directed out of the area) in in in out
The program then generates a .png file that contains
i) the land points in black
ii) the wet points in gray
iii) the initialisation of the domain mask in white.
This png file is displayed in Fig. 2.17.
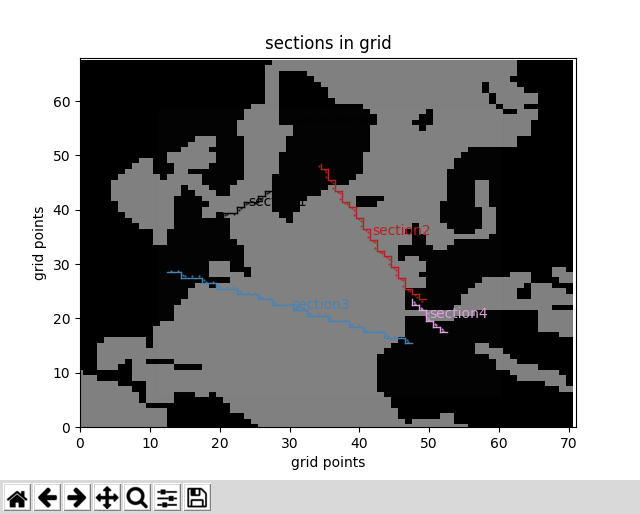
Fig. 2.16 First figure displayed by the program for the generation of closed domains.

Fig. 2.17 PNG file created by the pypago.pypago_grid.areas_MODEL()
function (mask_init_natldom.png).
Then, a message is prompted by the terminal:
Edit the mask_init_spg.png file using gimp, paint
or any other software. Fill in white the area enclosed
in your boundaries. Save the new png file as mask_init_spg_bis.png.
When done, press any key
To complete the creation of the domain, an image manipulation image
must be called in. In this step, the user must manually complete the
mask by filling in white the inside of the domain. The user must also
carefully check that no pixel has been missed. In our example, the
resulting .png file is presented in Fig. 2.17.
When the ENTER key is pressed, the figure displayed on
Fig. 2.19 and the following message is displayed:
Check that the domain mask is well defined
(i.e. between the section lines). If not,
reconsider the png edition
Is it ok? (0 if not) 1
The user must check that the white area is well positioned in regards
with the section.
If the domain is not well defined (for instance, a pixel is missing),
the user is invited to re-edit the .png file. If the user is ok with the domain,
he is proposed to define another section.
Define another area? (0 or 1) 0

Fig. 2.18 PNG file created using Gimp mask_init_spg_natldom.png.
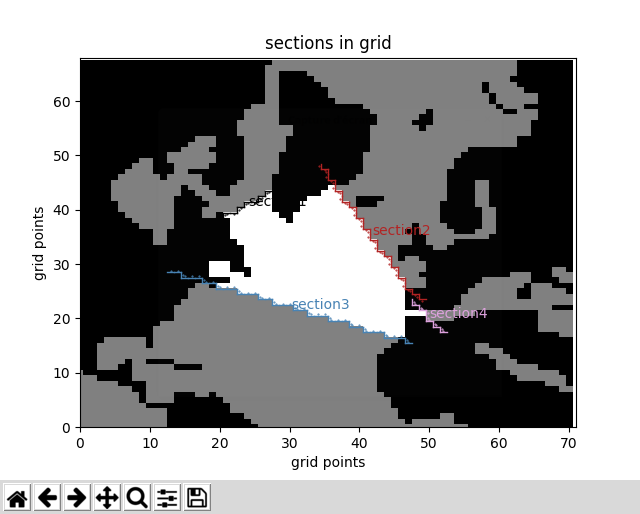
Fig. 2.19 When the ENTER key is pressed…
The output file contains the pypago.areas.Areas class.
In [7]: import pypago.pyio

In [8]: area = pypago.pyio.load('data/natl_domain.pygo')

In [9]: print(area[0])
Domain area, NEMO model:
  -i: (461,)
  -imax: 160
  -imin: 90
  -j: (461,)
  -jmax: 147
  -jmin: 80
  -mask: (68, 71)
  -modelname: NEMO
  -name: natldom
  -nlon: 182
  -secnames: ['section1', 'section2', 'section3', 'section4']
  -signs: [1, 1, 1, -1]
  -surface: (461,)
  -volume: (31, 461)
Note that contrary to domains defined from polygons, domains defined from sections have 2 additional arguments:
- secnames is a list of the names of the sections that define the domain
- signs is a list of the signs of the section transport regarding to the domain budget (+1 if the section transport is toward the domain, -1 if the transport is outward of the domain).