2.2. Definition of section longitude/latitude endpoints
One of the main purpose of PyPAGO is to compute transport indices across pre-defined sections. Therefore, the first step is to define the section longitude and latitude endpoints.
The user can either define section endpoints directly in a Python script, by using the
pypago.sections.Section class, or by using an interactive GUIS.
2.2.1. Definition of endpoints in a file
An example of section endpoits definition is provided below:
"""
Example of section endpoints
definition, loading and saving
"""

import pypago.pyio
import pypago.sections

# initialisation list of sections
listofsec = []

# creation a new section
name = 'mysection'
lon = [-70., -43.5]
lat = [54.5, 68.]
dire = ['NW']
section = pypago.sections.Section(name, lon, lat, dire)
print(section)

# adding the section to the list
listofsec.append(section)

# saving the list of section into a file
pypago.pyio.save(listofsec, 'data/sample_section.pygo')

# loading the previously saved file
listofsec = pypago.pyio.load('data/sample_section.pygo')
print(listofsec[0])


################## Definition of NATL sections

listofsec = []

name = 'section1'
lon = [-70.5, -44.5]
lat = [54.225, 69.225]
dire = ['SE']
section = pypago.sections.Section(name, lon, lat, dire)
listofsec.append(section)

name = 'section2'
lon = [-36.,   -4.5]
lat = [71.225, 40.225]
dire = ['SW']
section = pypago.sections.Section(name, lon, lat, dire)
listofsec.append(section)

name = 'section3'
lon = [-77.,   -7.5]
lat = [46.725, 27.725]
dire = ['NE']
section = pypago.sections.Section(name, lon, lat, dire)
listofsec.append(section)

name = 'section4'
lon = [-2.93942993, -6.68052257]
lat = [32.57422803, 40.0564133 ]
dire = ['NE']
section = pypago.sections.Section(name, lon, lat, dire)
listofsec.append(section)

pypago.pyio.save(listofsec, 'data/new_endpoints_natl.pygo')

################################## definition of indian sections

listofsec = []

name = 'section4'
lon = [ 37.5, 118.5]
lat = [  3.225, -25.275]
dire = ['NE']
section = pypago.sections.Section(name, lon, lat, dire)
listofsec.append(section)

name = 'section5'
lon = [33.5, 76.5]
lat = [-9.775, 15.725]
dire = ['SE']
section = pypago.sections.Section(name, lon, lat, dire)
listofsec.append(section)

pypago.pyio.save(listofsec, 'data/new_endpoints_indian.pygo')
In [1]: import os

In [2]: cwd = os.getcwd()

In [3]: print(cwd)
/home/barrier/Codes/pago/pypago/doc_pypago

In [4]: fpath = "examples/define_endpoints.py"

In [5]: with open(fpath) as f:
   ...:     code = compile(f.read(), fpath, 'exec')
   ...:     exec(code)
   ...:
Section mysection
    -lon: [-70.  -43.5]
    -lat: [54.5 68. ]
    -dire: ['NW']

Section mysection
    -lon: [-70.  -43.5]
    -lat: [54.5 68. ]
    -dire: ['NW']
In [6]: print(section)
Section section5
    -lon: [33.5 76.5]
    -lat: [-9.775 15.725]
    -dire: ['SE']
First, the list of section endpoints (listofsec variable) is initialised as an empty list. Then, one section
is created by using the pypago.sections.Section class by providing the name, longitude, latitude and direction of the
segments. Then, the section is added to the section list.
Then, the list of sections is saved by using the pypago.pyio.save() function.
Warning
The user must absolutely save a list of section endpoints, even if only one section is defined.
2.2.2. Definition of endpoints using a GUI
This is achieved by running the
pypago.guis.gui_sections_edition program.
It opens the GUI that is shown in Fig. 2.1.
2.2.2.2. Map handling
In the upper-left corner, the widgets are intended to map handling:
The lone, lonw, lats, latn TextControl widgets allow to edit the geographical limits of the map (eastern and western longitudes, southern and northern latitudes respectively). The default setting displays a global map. To validate changes, the ENTER key must be pressed in the TextControl widget.
The lon0 and boundinglat TextControl widgets allow to edit the values of the central longitude and of the bounding latitude for the northern and southern pole-centered projections. To validate changes, the ENTER key must be pressed in the TextControl widget.
The projection ComboBox allows to select the projection of the map. The available projections are Cylindrical Equidistant (
cyl, default), North-Polar Stereographic (npstere), South-Polar Stereographic (spstere) and Lambert Conformal (lcc).The resolution ComboBox allows to change the resolution of the map. The available resolutions are crude (
c, default), low (l), intermediate (i), high (h) and full (f). The full resolution must only be used for very localised studies.The Plot mode ComboBox allows to change the map background plot. When set to
Filled continents, continents are filled in gray and coastlines are drawn in black. If set toETOPO, the background is the bathymetry/topography map of ETOPO (called by using thempl_toolkits.basemap.Basemap.etopo()function). If set toMap Background, the map background chosen by the user (using the Background/Load background file item) is plotted (as shown for instance in Fig. 2.2). If no background file is provided, a DialogBox is opened, warning the user that no files has been loaded. And theFilled Continentsmode is used instead.When the plot mode is set to
Map Background, the clim TextControl widget allow to change the colorbar upper and lower limits. 21 contours are plotted between the lower and upper colorbar limits.When the plot mode is set to
Map Background, the colormap ComboBox allows to change the colormap used in the filled contour. All the default matplotlib colorbars can be used.

Fig. 2.1 GUI of the pypago.guis.gui_sections_edition program
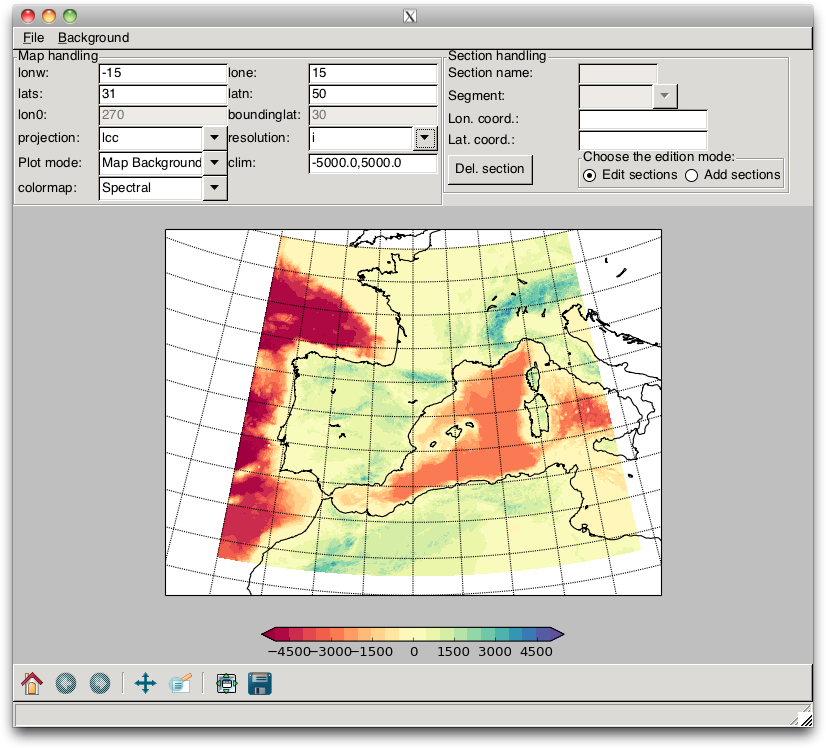
Fig. 2.2 Example of a map background (here, the GEBCO08 bathymetric chart)
2.2.2.3. Section definition
When we have selected the domain of interest and the proper map background, sections can either be created or edited, depending on the values of the RadioBox Choose the edition mode.
2.2.2.3.1. New sections
If the Choose the edition mode RadioBox is on the Add sections item, the user may define new sections. Note that when this mode is activated, the map cannot be edited anymore.
Section endpoints are added by left-clicks on the map, as shown in
figure Fig. 2.3. The section is then validated by a
right-click, allowing another
section to be added. By default, the sections are named
section1, section2, section3 and so on. Sections
can also be created by simply entering the section coordinates in the
TextControl widgets (the ENTER key must be pressed).
Warning
Note that the longitudes and latitudes must be separated by “,”.
When all the sections have been defined and validated, they must be edited. This is done by switching Choose the edition mode RadioBox to Edit sections.

Fig. 2.3 Example of section creation.
2.2.2.3.2. Section edition
When the Choose the edition mode RadioBox is on the Edit sections mode, the user may edit the defined sections (i.e. change the section names, positions and segment directions). The section that have been validated are drawn in thick black lines.
As a first step, the user must chose a section to edit. This is achieved by clicking on one of the line. When done, the sections endpoints appear as orange filled circles, the name of the section appears in the Section name TextControl widget, the section coordinates appear in the Lon. coord. and Lat. coord. TextControl widgets and the different segments of the segments are shown (Fig. 2.4).
The user can change the name of the section as well as the section longitude and latitude coordinates. This is done by modifying the text in the Section name, Lon. coord. and Lat. coord. TextControl widgets. The changes must be validated by pressing the ENTER key in the widget. The position of the section can also be modified by a “click and drag” on the section endpoints.
A critical step in the use of PyPAGO is the definition of the orientations of the sections (i.e. the direction where the transport is counted positive), which must be carefully checked out by the user. By default, all the sections have their segments oriented North-Eastward. The user must therefore set the right orientations. This is achieved by clicking on one of the segment number, as shown in Fig. 2.4. Then, the user is able to change the orientation of the section by changing the value of the Segment #N ComboBox (with N the number of the segment). Available orientations are North-East (NE), North-West (NW), South-East (SE) and South-West (SW).
Selected sections can also be deleted after a click on the Delete button.
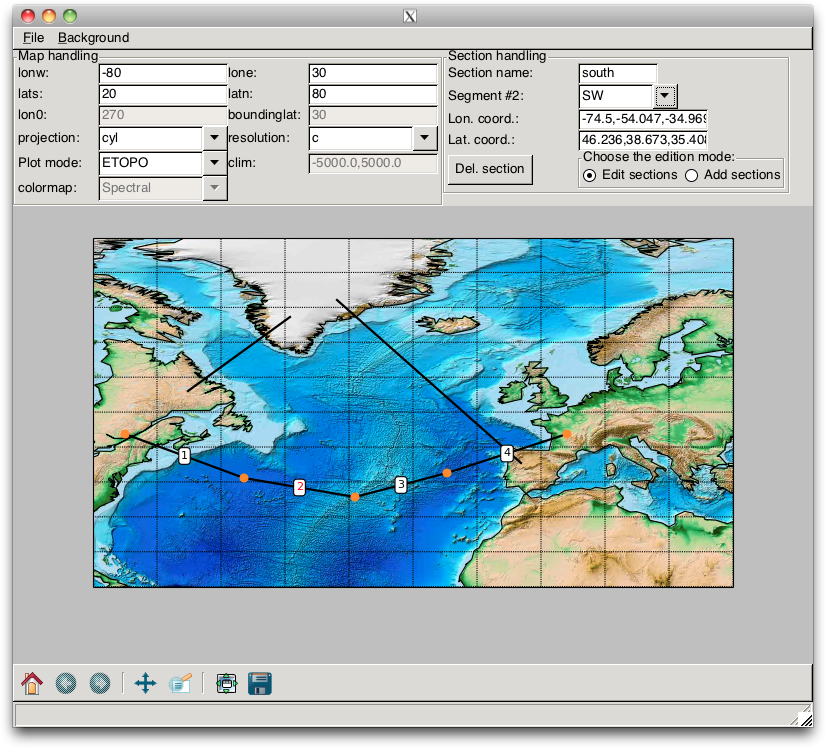
Fig. 2.4 Example of section edition.